DIY Playhouses: A Fun Family Activity
DIY playhouses are a great way to bring the joy of playtime into your home. Whether you’re looking for a fun project to do with your kids or you want to offer something special for the little ones in your life, building your own cardboard playhouse is an exciting and rewarding experience. Building your own cardboard playhouse also has educational benefits; kids will learn practical skills such as construction, design, and problem solving. Plus, they’ll learn the importance of recycling and being resourceful by using existing materials. The best part is, it can all be done for a fraction of the price of store-bought playhouses – and with much less hassle!
This guide will provide step-by-step instructions for building your own cardboard playhouse. We’ll cover what materials you’ll need, how to design the playhouse, preparing the cardboard, stabilizing the structure, adding other touches, cleaning up and safety tips. Read on to learn how to build your own cardboard playhouse!
What You’ll Need
Creating your own cardboard playhouse is a fun and rewarding experience. But it also requires some preparations, especially when it comes to gathering the materials you’ll need. Here are some of the items you’ll need for this project.
- Large pieces of cardboard (at least 1/4 inch thick)
- Utility knife or scissors
- Masking tape or duct tape
- Paint or markers for decorations
- Glue or paste (for decorations)
You can purchase most of these supplies at any hardware store or art supply store. If you are doing a larger project, you may need more than one sheet of cardboard. In that case, you can visit local retailers who specialize in selling large sheets of cardboard, such as shipping boxes companies.
Designing the Playhouse
Creating the perfect cardboard playhouse for your family is fun and exciting! The size, shape, and design of your playhouse will depend on the space you have and the age and number of children playing in it. Here are some ideas to help you create a safe and enjoyable DIY playhouse.
- Dimensions: Before you start cutting and assembling, measure how much space you have and determine the size of your playhouse. To prevent kids from getting hurt, make sure there is enough room for them to move freely without bumping into any sharp edges or corners.
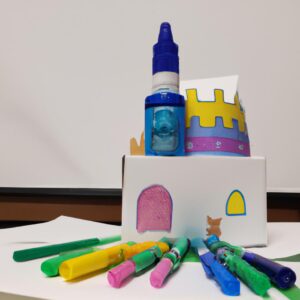
- Interior Decorations: Once you have all the pieces of cardboard cut and put together, you can then have some fun deciding how to decorate the inside of the playhouse. Paint it with bright colors like pink, blue, and yellow and add some embellishments like glitter, pom poms, and tassels. You can also repurpose items like old shoe boxes and cereal boxes and turn it into fun decorations like furniture, clocks, bookshelves, and more.
- Other Details: Add various activities like a puppet show theatre, mini bowling alley, wall art, and handcrafted dolls to keep the kids engaged and entertained. You can also create a secret entrance by making a fake wall with a hidden door. For extra safety, add carpet inside the playhouse to soften edges and to prevent slipping if kids run around.
Preparing the Cardboard
Now that you have decided what kind of playhouse you want to build, it’s time to begin preparing the cardboard pieces for assembly. Having the right materials and tools are key to building a successful and sturdy playhouse.
You will need sturdy cardboard sheeting, craft or box cutter knives, scissors, and tape. It is also recommended that you have a ruler for precision. You will need to measure and cut your cardboard into the desired shapes needed for your playhouse.
It is best to draw out your design before you begin cutting each piece. This ensures that the pieces will fit into each other as you assemble the playhouse. When drawing out the design, it is important to take into account any doors, windows, or other portals that may be necessary for access into the playhouse.
Once you have drawn out the design and all the pieces have been drawn, you can start cutting the cardboard. Using a ruler and a craft knife, carefully cut along the lines you drew on the cardboard. Be careful and take your time as to not ruin the cardboard piece.
When you are done cutting the pieces, you should have all the finished pieces needed to begin assembling your playhouse. Make sure all edges are smooth and there are no sharp corners.
Stabilizing the Structure
When putting together your cardboard playhouse, it’s important to make sure that the structure is stable and will be able to withstand any activity that happens in the playhouse. Here are some tips to help you ensure the playhouse holds up for years of fun:
- Use a strong adhesive or glue to hold the pieces together. Wood glue is an excellent option, but hot glue or other craft adhesives can also work.
- Consider reinforcing the structure with wooden or metal supports. These can be attached to the cardboard itself with screws or nails.
- Make sure the playhouse is set up on a flat, even surface. Uneven surfaces can weaken the cardboard and cause it to collapse.
These tips should help you create a stable and secure cardboard playhouse for the kids to enjoy.
Other Touches:
Once you’ve completed the cardboard structure, it’s time to think about other touches. There’s no limit to what you can do to make your playhouse unique. Have fun decorating and personalizing it with artwork, strings of lights, DIY accessories, even potted plants! You can also add a window box or platform to give it an extra touch.
- Artwork
- Lights
- DIY Accessories
- Potted Plants
- Window Box
- Platform
Depending on the size of the cardboard and your creative vision, you can think up all kinds of other touches to bring the playhouse to life. Have your kids collaborate on ideas for what they’d like to see in their new playhouse and let them have fun making it come together.
Cleanup & Safety
A cardboard playhouse is sure to be a hit with the kids, but it’s important to keep things clean and tidy to make sure it remains safe. Here are some tips to keep the playhouse neat and secure:
- The playhouse should be kept dry at all times to avoid any potential mold or mildew.
- Regularly check the exterior for any edge pieces that may have come loose or need to be reattached.
- Dirt, dust, and pet fur can be removed from the exterior with a damp cloth or vacuum.
- If using glue, ensure that it is non-toxic and age appropriate.
- Keep sharp objects away from the playhouse – this includes cutting tools like scissors and knives, and anything else that could cause injury.
- Keep an eye out for anything that may be too small to swallow, such as beads or buttons.
- Teach your children about the importance of safety around the playhouse.
These tips will help to keep the playhouse clean and safe for years of fun and memories.
Conclusion
Building your own cardboard playhouse is a great project for families with kids of all ages. With the right materials and tools, you can create a unique and fun playhouse that your children will love for years. By following our steps, you can design and build a safe and sturdy playhouse, and add extra touches to make it more inviting. With our guidance, you can have your playhouse ready for adventure in no time! So get started on your DIY playhouse today!
comments: 0